Tuesday, 12 February 2013

DPP-Part 2; Exercise 4


Exercise; Your camera’s dynamic range
 
I had to see how my camera copes with ‘dynamic range’, that is, how it deals with strong highlights and extremely dark shadows, even though you can adjust the camera aperture, it will read different level s across the frame.
The best dynamic range is when you have an image with bright sunlight, an area with deep shadows and a reflective surface, for this exercise I had to find such and image, keep my ISO low and turn off any noise reduction function which my camera may have (which is none).
Currently, it is quite difficult to find a sunny day; however, there was one cloudy one, where the sun came out occasionally, so I had to wait for the right moment.

When taking the photo, I used the overexposure function on my camera; to ensure there was no highlight clipping, here is the image that I took.

1/800 seconds at f/4.0 – ISO 100 
Next, I then had to measure and take notes of the brightness of the white areas and dark areas, with my camera by zooming in to measure these areas, making notes of the aperture and shutter speed.


1/80 seconds at f/5.6 – ISO 100

 
1/25 seconds at f/3.2 – ISO 100

Then in Photoshop, I magnified the image to 100% in the highlighted area and checked with the pixel value sampler, to see what the value of the light part of my image was, the value in each channel is as follows;-

R; 236
G; 235
B; 233

Next I magnified the image again to 100%, but in the dark area, and adjusted the exposure so you could only just see the detail in the image and had to measured the area again, the value in each channel is as follows;-

R; 27
G; 17
B; 23
 
When lighting the shadow areas of the image, the noise was extremely apparent and did not look good, as stated in the course notes, the real detail and noise are competing with each other and there is a difficulty in telling which is which.

With regards to calculating my cameras dynamic range, I have been having a bit of trouble with this, I have used my lightest image and darkest image and calculated the f-stops in between, it seems no matter how many times I calculate this, I am coming up with is 3 stops, however, when I look at forums etc, it says that my camera has a dynamic range of 10 stops.

So on reflection, I did the experiment again, with a piece of white card and a completely black shadow, by doing this again, I came up with;-

Light; 1/500 @ f/22.0
Dark; 1/100 @ f/4.5

Which gives me a dynamic range of 7 stops, which seems more plausible, but still not correct, on this occasion, it will have to do!, on completing this again, I think I have at least tested it correctly.

I found this exercise both interesting and frustrating. Interesting to work out the dynamic range and understand my camera a lot more , but frustration due to the experiment not working correctly the first time, but as they say….if at first…..


DPP-Part 2; Exercise 3


Exercise; Your tolerance for noise

This exercise is all about how to deal with ‘noise’ in your photographs and what happens when it’s magnified , I had to take a series of photographs, in the exact same position, light and settings, but adjusting the ISO, so to see how the ISO settings effected the image. I chose to use the manual settings on my camera, to keep the shutter speed and the aperture the same. I did not change or adjust the images on my computer (apart from the magnified images) so to show the noise volume at its original state.

These are the following settings for my noise settings on my camera;-
·         100
·         200
·         400
·         800
·         1600

1; 1/4 seconds at f/4.0 – ISO 100


2; 1/4 seconds at f/4.0 – ISO 200


3; 1/4 seconds at f/4.0 – ISO 400


4; 1/4 seconds at f/4.0 – ISO 800


5; 1/4 seconds at f/4.0 – ISO 1600


ISO - 100

ISO – 1600

The first magnified image is with the ISO setting on 100, as you can see in the magnification, there is very little noise and the light is dark but defined.

The second magnified image is with the ISO setting on 1600, with this image the brightness is astounding and so is the noise.
I think the best photo is at around 200 for the naturalness of the image and the 400 due to the brightness and the more dynamic feel, without too much of a loss in image quality, I believe that sometimes noise is a good thing, depending on how you would like the overall image to look.


DPP-Part 2; Exercise 2


Exercise; Highlight clipping

For this exercise, I had to take a photograph on a sunny day, so that I would produce an image with very high contrast, so to develop strength in highlight clipping.
Highlight clipping is when you compose a photograph, so that it has not got a wide range of brightness and appears with much contrast, then looks over exposed in one area and to dark in another, this is called ‘roll-off’ and this kind of image is almost always to be avoided .
When you take an image, the camera doesn’t read that image the way your eyes do, this exercise will help develop the skills to ensure this does not happen in the future, by showing what happens when you take a photograph.

After I found what photo would be good for this exercise, I had to find the exposure setting that highlight clipping would only just appear on my camera, this function is available in the display of the camera, once the photo has been taken.

For the purpose of this exercise, no post production is to be done on the image and I am only shooting in JPEG.

I had the camera on the manual setting, so that I could keep the shutter speed the same, but change the aperture. I then had to take the same image, with 5 different f-stops
 
First image;

1; 1/160 seconds at f/11
 
This image was just on the cusp of the overexposure warning on the cameras LCD screen.


Second image;
2; 1/160 seconds at f/9.0

I then had to put the aperture up by 1 f-stop, therefore increasing the highlight in the image.


Third image;
3; 1/160 seconds at f/13.0
 
For this Image, I had to go down an f-stop from the original position, to make the image darker.


Fourth image;

4; 1/160 seconds at f/14.0

For this Image, I had to go down an f-stop from the last photo, to make the image darker.


Fifth image;

5; 1/160 seconds at f/16.0

For this Image, again, I had to go down an f-stop from the last photo, to make the image even darker.

After taking these images, I put them side by side and magnified each highlighter area. Here are the differences that I could see, with regards to the following aspects;-

Completely lost areas of visual information
On examination, when I magnified the image I found the clouds were lost, with the more light I let in on to the image sensor, alas, after I had changed the settings, the cloud had gone. Obviously, the more light you let in the more the image is washed out and over exposed; this didn’t seem to happen in the latter images.

A visible break in the form of an edge between nearly white and total white
This only seemed to be apparent on the first image, where there was only a bit of over exposure; I think that it may have to do with the cloud or the appearance of the sky. On consideration, I can see it in the second image, again, due to exposing the sensor to more light.

A colour cast along a fringe bordering the clipped white highlight
The boarders with the higher f-stops, seemed to be washed out, like it was moulding in to the back of the sky, there was a purplish tint on the fringes of the tree. With the darker images, there was a bit of a tint but it was bluer and not as strong in colour or size.

The colour saturation
As I predicted, the colour is washed out in the first images and richer on the latter, I think that it makes a massive amount of different to the saturation of the image. I think the image with the best colour and closest to how the colours looked, is the third image. I think it’s really interesting, how a slight alteration of the aperture can alter everything. In the darker images, the colour is more defined and pleasing to the eye; however, the shadows make the fifth image, to much of a gloomy scene.


DPP-Part 2; Exercise 1

 
Exercise; Sensor linear capture

For this exercise, I have to choose any TIFF or JPEG and generate a ‘curve’ in Photoshop which will show what the image looks like, before the ‘in camera’ processing is applied.

I have chosen an image with ‘Dynamic Range’, which means the image has a tonal range at opposite ends of the tonal scale on the histogram….an image that has dark and light areas.


First image;
Firstly, this is my original image with the histogram; I have changed the image to 16 bits per channel, as I will be making some strong adjustments, it is better to have it on this channel as 8 bit may create some banding.


Second image;
I have now done a ‘curve’ that will demon straight how the image would have looked, when it was captured and before the ‘in camera’ processor adjusted it.

This is the curve that I implemented in to the image to get the following result below;
 
 
By creating this curve the image has changed drastically, the colours are more vivid, or turned completely, so much so, they almost look black, where as the highlights are more defined, with a lot more detail. The histogram, as you can see, has moved over to the left, which is directed more in the darker tonal ranges of the image.


Third image;
The next ‘curve’ was adjusted on the 1st curve image; I took that amended image and adjusted the curve to go in the opposite direction, to make the image as close to the original image.


This is the curve that I implemented in to the image to get the following result below;


This is as close as I could get the image back to normal, without it looking washed out, there is still a bit of difference, the colours seem richer and the histogram is only slightly different.
If the original image was too dark to begin with, then this is the curve I would use for any correction that I need to make on the image.

As the information states, the main problem with this post production process is, that ‘noise’ in the shadow areas are more prevalent, on magnifying the image, I can see the noise level differs from the original image. I found this exercise extremely helpful for my post production work; however, I would like to get it right in the first place!.


Sunday, 6 January 2013

DPP-Assignment One; Learning Log


Learning log – DPP assignment 1; Workflow

 My Thoughts
As I said previously, this assignment was good for me to structure a photography shoot, I will use this way of working from now on and it will assist me if future ventures, I enjoyed the subjects that I had to do/chose, as it was not the ‘norm’ for me and I’m extremely pleased with my final images.

Strengths on my assignment
I think it is the organisation and logical thinking, with the way that I plan from start to finish.
 
Weaknesses on my assignment
I struggled with doing it a slightly different way on the exercises and then he assignment, however, I feel that it’s a better way of working.


My research sources-Book and websites

DPP-Assignment One


Assignment One; Workflow

Object of assignment One
For this assignment, I need to devise a themed assignment on a topic that interests me, which I feel comfortable with, by using what I have learned so far, so to construct an effective workflow, from start to finish.

I found this assignment  helpful with the way I construct a shoot from start to finish, I chose to use take photographs of a candlelit, Christmas eve service in a village church, it was defiantly a challenge, due to lighting, however, I was pleased with the final results.

Here is the workflow chart I used for this assignment;-


Choosing a subject
I wanted to choose a subject first, so I could see what equipment I needed. I decided to choose a village church, which was having a candlelit service on Christmas Eve.

Choosing my equipment
I choose to use my 72mm lens as I think it was a good choice to get different compositions and a better range, I also took my wide angle lens, so to get a lot of the church in the view and I took my tripod as I knew there would be limited light.

What to ensure was ready
I charged all my batteries the day before, bought an extra memory card with me and I had my lens cleaning kit.

Timing
I arrived at the church before everyone else, so that I would have some time to get ready and I knew the shoot could last on and off for 3 ½ hours, from when I arrived, to the end of the service.

When I arrived
I took images of the outside of the church, fired a few test shots and tried to do under and over exposure, in case I needed to splice them, then I went inside the church with no one inside it, so I fired some more test shots, however, I knew that the light would be changing but the settings would be changed slightly rather than drastically.

Settings
After I did the test shots, I then adjusted all of my settings (ISO, Aperture etc) to ensure the lighting was how I wanted it to react with the camera and took some more shots.

Shoot
Throughout the shoot, I was trying different viewpoints, without getting in the way or disturbing anyone, I had asked for permission before hand but the patrons didn’t know why I was there, so I needed to be as low key as I could.

After the shoot
I went home and uploaded via bridge, here are the original images.

Step one; - Originals
 
 
I created a file called originals and downloaded the images with Bridge.

 
Step two; - Deleted
 
 
I then moved photos that I wanted to delete, in to a new folder, that weren’t in focus or with bad composition/light that I couldn’t edit in post production.

 
Step three; - The selects


I then selected the images that were good and that I could edit.

 
Step four; - The first selects


From that point, I took a break from the images and went back, and then I selected the images that I would most like to use, almost for the final process.

 Step five; - Final choice


I then chose 7 images that I was happy with and these are the images that I selected to edit.
 

Step six; - Final edits/to use 


These are the final images, which I’m extremely happy with; I feel they give a real sense of the whole evening.

With the help of the exercises in this section, I feel I have generated a constructive and organised workflow, I think that my workflow doesn’t vary much from others, it’s and extremely logical way of working and as I stated before, I will work this way from now on.


DPP-Part 1; Exercise 4

  
Exercise; Editing

This is all about how I go about the process of editing my images, I am allowed to and have combined this with a previous exercise in this section, I choose to show the work flow of my mechanic. I have to have a large number of images to edit. The editing processes is as follows;-

Step one; – Original (Technical edit)
 
 
Although this is not a step in the exercise, I feel that this is an important one. This is all the images that I took on the day, I then took out all of the images that were obviously faulty.


Step two; - Deleted (Technical edit)


These are the deleted images, they were either, out of focus, too under exposed and not composed well enough for me to edit in post production.


Step three; – Best images (The selects)


These are the images that are best, after the deletions have been done.


Step four; - The first selects


These are my favourite images because of his facial expressions, I also wanted to get the smoke in the image and I like the composition on all of the images.

 
Step five; - Group and review
I went back and had a look at the previous images, to check if I wanted to change my mind on any of them and add new ones in or take old ones out of the “first selects”, I  didn’t need to as I am happy with my choice.


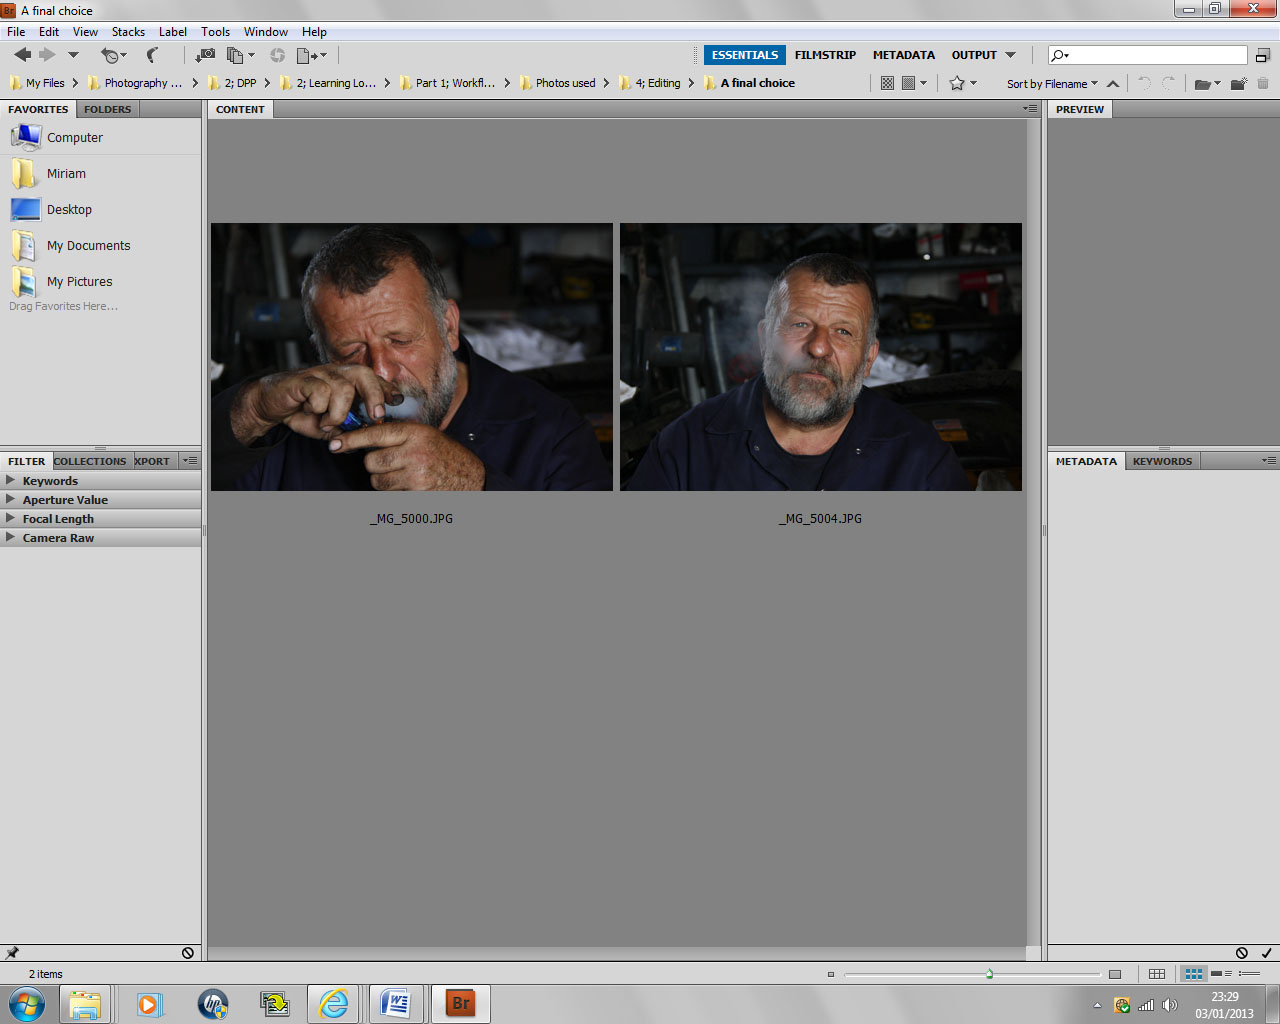
Step six; - A final choice
 
 
I chose to edit the 1st image as I like the composition of it, even though it’s not “technically” correct, as I’m missing a slight bit of his heard and a bit of his hand. However, I feel that adds to the image, I like that he is slightly off centre and the hands and the smoke are the main focus, if I were to have zoomed out a bit, I think the clarity and focused detail would have been lost.

I chose the second image because of the clarity and focus on his face, also, the reflection in his eyes and I like the gazing look that he gives whilst thinking.

I found this exercise really interesting, I liked the different way of editing, I usually edit slightly differently, as per my workflow assignments, but I think I will use this way from now on as it is logical in its execution.


The final two images, edited, in picture form;-